Category: Uncategorized

  • Ubuntu: Make your apache2 www accessible

    You are going to need write access to /var/www, which

    sudo adduser LOGIN_ID www-data
    sudo chmod g+rwX -R /var/www
    

    will establish. Next thing would be to create a shortcut in your home directory:

    sudo ln -s /var/www /home/LOGIN_ID/
    

    After connecting with the FTP server you should now see the www folder alongside the Desktop folder.

  • Secure SSH on MacOS

    In /etc/ssh/sshd_config add the following line:

    AllowUsers <username>@<Static IP> and repeat with a space for other allowed IPs in the same form. This will restrict SSH access to your own IP addresses.

    Use sudo Nano /etc/ssh/sshd_config

    Then Restart the Mac.

  • Setting up a web server on macOS

    Lines in bold are what you will have to type in. Replace <your short user name> with your short user name.

    Here goes… Enjoy!

    To get started, edit the Apache configuration file as root:

    sudo vi /etc/apache2/httpd.conf

    Sorry, but PHP is NOT included in Sonoma. Apple even includes the following note at line 187 of this file:

    #PHP was deprecated in macOS 11 and removed from macOS 12
    

    Unfortunately, Perl will also not work with Apache in Sonoma. Sonoma ships with a broken version of Perl that will not work with the mod_perl module. See this bug report: https://github.com/Perl/perl5/issues/17154

    So for now, we’ll go old-school and use the ancient mod_cgi method. As an added benefit, if you install your own PHP interpreter, you can run PHP scripts this way too. Your CGI scripts will run more slowly than with the mod_* versions.

    If you want to run CGI scripts, you will need to do the following:

    Enable mod_cgi by uncommenting line 174 changing:

    	#LoadModule cgi_module libexec/apache2/mod_cgi.so
    

    to

    	LoadModule cgi_module libexec/apache2/mod_cgi.so
    

    (Note that this is dependent on the state of the mpm_prefork_module, which is enabled by default. This is User Tip is meant to be as simple as possible. Don’t overcomplicate things.)

    Enable personal websites by uncommenting the following at line 184:

    #LoadModule userdir_module libexec/apache2/mod_userdir.so
    

    to

    LoadModule userdir_module libexec/apache2/mod_userdir.so
    

    (See below for an important new ACL change that are required in Sonoma for personal websites.)

    and do the same at line 521:

    #Include /private/etc/apache2/extra/httpd-userdir.conf
    

    to

    Include /private/etc/apache2/extra/httpd-userdir.conf
    

    Now save and quit.

    Open the file you just enabled above with:

    sudo vi /etc/apache2/extra/httpd-userdir.conf

    and uncomment the following at line 16:

    #Include /private/etc/apache2/users/*.conf
    

    to

    Include /private/etc/apache2/users/*.conf
    

    Save and exit.

    Lion and later versions no longer create personal web sites by default. If you already had a Sites folder, it should still be there. To create one manually, enter the following:

    mkdir ~/Sites

    echo “<html><body><h1>My site works</h1></body></html>” > ~/Sites/index.html.en

    While you are in /etc/apache2, double-check to make sure you have a user config file. It should exist at the path: /etc/apache2/users/<your short user name>.conf. 

    That file may not exist and if you upgrade from an older version, you may still not have it. If that file doesn’t exist, you will need to create it with:

    sudo vi /etc/apache2/users/<your short user name>.conf

    Even if the file does exist, double check the content.  Use the following as the content:

    <Directory “/Users/<your short user name>/Sites/”> 

      AddLanguage en .en 

      AddHandler cgi-script .cgi .pl .php

      Options Indexes MultiViews FollowSymLinks ExecCGI 

      AllowOverride None 

      Require host localhost

    </Directory>

    You may need to make changes to this configuration to enable things such as additional languages, access from devices other than localhost, and .htaccess file overrides.

    There were new security defaults in macOS 13 “Ventura”. By default, other users have no access to another user’s home directory. This includes the special “_www” user that is running the Apache web server. Run the following command to give the Apache web server access to the Sites folder in your home directory.

    chmod +a “_www allow execute” ~

    This will add an ACL permission to your home directory that will allow the Apache web server access to all subdirectories inside your home directory. The permissions on those subdirectories may allow, or deny, access to other users such as the _www user. If you wanted to be extra paranoid, you could change the permissions on all subdirectories (except for the “Sites” folder, obviously) to disallow any access from other users. But this User Tip is a minimal setup guide, so we will just do the minimum here.

    Now you are ready to turn on Apache itself. But first, do a sanity check. Sometimes copying and pasting from an internet forum can insert invisible, invalid characters into config files. Check your configuration by running the following command in the Terminal:

    apachectl configtest

    If this command returns “Syntax OK” then you are ready to go. It may also print a warning saying “httpd: Could not reliably determine the server’s fully qualified domain name”. You could fix this by setting the ServerName directive in /etc/apache2/httpd.conf and adding a matching entry into /etc/hosts. But for a development server, you don’t need to do anything. You can just ignore that warning. You can safely ignore other warnings too.

    Turn on the Apache httpd service by running the following command in the Terminal:

    sudo launchctl load -w /System/Library/LaunchDaemons/org.apache.httpd.plist

    This command could fail with an error: “Load failed: 37: Operation already in progress”. If so, that means your web server is already running from a previous operating system version. However, you will still need to bump Apache to reload with the configuration changes you’ve just made. Use the following command:

    sudo apachectl graceful

    In Safari, navigate to your web site by entering the following into Safari’s address bar:

    http://localhost/

    It should say:

    It works!

    Now try your user home directory by entering the following into Safari’s address bar:

    http://localhost/~<your short user name>

    It should say:

    My site works

    To test Perl, try something similar. Create a Perl test file with:

    vi ~/Sites/info.pl

    Use the following as the content:

    #!/usr/bin/perl

    use CGI;

    my $cgi = CGI->new;

    print $cgi->header( -type => ‘text/plain’ );

    print $ENV{SERVER_SOFTWARE};

    And test it by entering the following into Safari’s address bar:

    http://localhost/~<your short user name>/info.pl

    Make sure the file can be executed by the _www user by doing this:

    chmod ugo+x ~/Sites/info.pl

    You should see the following string:

    Apache/2.4.56 (Unix)
    

    Doing the same for PHP is left as an exercise for the reader. You will have to download and install a PHP interpreter. For extra credit, try something more modern like Python or Rust.

    If you want to setup MySQL, see my User Tip on Installing MySQL.

    If you want to make further changes to your Apache system or user config files, you will need to restart the Apache server with:

    sudo apachectl graceful
  • Change the VNC port on a Mac running as a server

    1. In Terminal: sudo nano /etc/services
    2. change the vnc-server ports (to search CTRL-W) Look for your VNX ports – 5900 and change to whatever. 

    3. Restart Computer.

  • Save space on your VPS – Turn off power Hiberation

    To disable hibernation in Windows, you can use the Command Prompt with administrator privileges. Open Command Prompt, type powercfg.exe /hibernate off, and press Enter. This will disable hibernation, and your computer will no longer be able to enter hibernation mode. 

  • Server 2022 needs reg hack to get users must enter a password box back

    If you type:

    control userpasswords2

    you used to have an option to make a PC or server passwordless or at least login with a password automatically each time.

    To get this check box back use the following command in powershell:

    reg ADD “HKLM\SOFTWARE\Microsoft\WindowsNT\CurrentVersion\PasswordLess\Device” /v DevicePasswordLessBuildVersion
    /t REG_DWORD /d 0 /f

    All on one line.

  • RESET WINDOWS 11 PASSWORD

    1) Has to be a local account not a microsoft account which you can do online by logging into microsoft.
    2) Find if it has the jumping man accessibility icon in lower right hand corner
    3) Hold left shift down and click on the power restart button lower right corner restart PC
    4) Continue to hold left shift key and you should see advanced options menu come up.
    5) Go into troubleshoot.
    6) Advanced options.
    7) Command prompt
    8) Find windows directory. will come up x:\windows ignore that use C:\ to see if its in c or d etc.
    9) cd c:\windows\system32 (if on c:)
    10) ren utilman.exe utilman1.exe
    11) ren cmd.exe utilman.exe
    12) close command prompt, click on continue to windows. If it doesnt work restart windows completely
    13) bottom right hand side click little man accessibility and a command prompt should open.
    14) type in control userpasswords2
    15) reset password. if greyed out you have a microsoft account.
    16) leave blank and remove password.
    17) continue to windows with blank password.
    18) setting accounts change password to
    19) hold left shift and restart PC
    20) troubleshoot
    21) advanced options > command prompt
    22) go to windows directory system 32
    23) ren utilman.exe cmd.exe
    24) ren utilman1.exe utilman.exe
    25) continue to windows.

  • Upgrade Ubuntu

    This path may not work for everyone but it did for our servers. Here are the steps:

    1. apt-get clean && apt-get update && apt-get upgrade

    2. apt-get dist-upgrade

    3. apt-get clean

    4. do-release-upgrade

    5. reboot

    6. (if you use pureftp) apt-get remove pure-ftpd-common pure-ftpd && apt-get install pure-ftpd-common pure-ftpd

    7. for servers using mysql databases:

    apt-get install php-mysql

    service apache2 restart

  • Setting the Time on Ubuntu/Debian Servers

    set time on Ubuntu:

    timedatectl set-timezone Australia/Sydney

    Set time on old Debian systems:

    ln -sf /usr/share/zoneinfo/Australia/Sydney /etc/localtime

  • Installing Ruby on Ubuntu

    Ruby Install guide stage 1:

    To install Ruby on Ubuntu and configure it with Apache, you’ll first need to install Ruby and its dependencies, then configure Apache to use Ruby’s mod_ruby or a suitable alternative like mod_passenger. You can achieve this by using the APT package manager or a version manager like Rbenv.

    1. Install Ruby:

    Using APT.

    Code

    sudo apt update
    
    sudo apt install ruby-full

    This installs Ruby, RubyGems, and other essential dependencies.

    Using Rbenv:
    Install dependencies:
    Code

        sudo apt update
    
        sudo apt install git curl libssl-dev libreadline-dev zlib1g-dev autoconf bison build-essential libyaml-dev libreadline-dev libncurses5-dev libffi-dev libgdbm-dev

    Install Rbenv:

    Code

         curl -fsSL https://github.com/rbenv/rbenv-installer/raw/HEAD/bin/rbenv-installer | bash

    Configure Rbenv:

    Code

        echo 'export PATH="$HOME/.rbenv/bin:$PATH"' >> ~/.bashrc
    
        echo 'eval "$(rbenv init -)"' >> ~/.bashrc
    
        source ~/.bashrc

    Install a Ruby version:

    Code

        rbenv install 3.2.3
    
        rbenv global 3.2.3


        rbenv install 3.4.2
    
        rbenv global 3.4.2

    (Replace 3.2.3 with the desired Ruby version).

    1. Configure Apache:

    Install Apache.

    Code

    sudo apt install apache2

    Install mod_ruby (if using that method).

    Code

    sudo apt install libapache2-mod-ruby2.7

    Configure Apache (example with mod_ruby):

    Create a virtual host configuration file (e.g., /etc/apache2/sites-available/my-ruby-site.conf):

    Code

         <VirtualHost *:80>
    
            ServerName your_domain.com
    
            DocumentRoot /var/www/my-ruby-site


            <Directory /var/www/my-ruby-site>
    
                Options Indexes FollowSymLinks MultiViews
    
                AllowOverride None
    
                Require all granted
    
                RubyInit /usr/local/bin/ruby # or the path to your ruby
    
             </Directory>


            RewriteEngine On
    
            RewriteRule ^/app/(.*) /index.rb?path=$1 [L]
    
        </VirtualHost>

    Enable the virtual host:

    Code

        sudo a2ensite my-ruby-site.conf
    
        sudo apache2ctl restart

    STAGE 2:

    To configure Passenger with Apache, you need to add specific configuration snippets to your Apache configuration file, typically httpd.conf or apache2.conf. You can achieve this by using the
    command, which will guide you through the process and provide the necessary snippets.

    Steps:
    Install Passenger: Make sure you have Passenger installed.

    Run the installer: Execute the passenger-install-apache2-modcd /etc/apache2
    command in your terminal.

    Follow the prompts: The installer will guide you through the process, including asking you to copy and paste the generated configuration snippets into your Apache configuration file.

    Identify the configuration file: Determine the location of your Apache configuration file (e.g., /etc/httpd/httpd.conf or /etc/apache2/apache2.conf).

    Add the snippets: Open the configuration file and paste the LoadModule directive and the other Passenger configuration options provided by the installer.

    Enable the module: Use the command sudo a2enmod passenger (or similar, depending on your system) to enable the Passenger module, says the Phusion Passenger documentation .

    Restart Apache: Restart your Apache server to apply the changes.

    Example snippets:

    The passenger-install-apache2-module command will generate snippets similar to these:

    Code
    LoadModule passenger_module /path/to/passenger/lib/httpd/mod_passenger.so PassengerRoot /path/to/passenger PassengerRuby /path/to/ruby/bin/ruby PassengerAppRoot /path/to/your/rails/app # Other Passenger settings

    Notes:
    Replace /path/to/passenger, /path/to/ruby/bin/ruby , and /path/to/your/rails/app with the actual paths to your Passenger installation, Ruby interpreter, and Rails application, respectively.

    The exact snippets and commands may vary slightly depending on your operating system, Apache version, and Passenger version.

    LoadModule passenger_module /root/.rbenv/versions/3.4.2/lib/ruby/gems/3.4.0/gems/passenger-6.0.27/buildout/apache2/mod_passenger.so
    PassengerRoot /root/.rbenv/versions/3.4.2/lib/ruby/gems/3.4.0/gems/passenger-6.0.27 PassengerDefaultRuby /root/.rbenv/versions/3.4.2/bin/ruby

    Stage 3:

    I have come across a cleaner solution today. This might help future users. The command –

    passenger-install-apache2-module
    tells me to put these three lines in apache configuration file.

    LoadModule passenger_module /root/.rbenv/versions/3.4.2/lib/ruby/gems/3.4.0/gems/passenger-6.0.27/buildout/apache2/mod_passenger.so
    PassengerRoot /root/.rbenv/versions/3.4.2/lib/ruby/gems/3.4.0/gems/passenger-6.0.27 PassengerDefaultRuby /root/.rbenv/versions/3.4.2/bin/ruby

    But, where is that configuration file? The answer is the configuration files are seperated into many pieces and they reside in /etc/apache2/mods-available.

    So you should do three things –

    Create a file ending with .load in /etc/apache2/mods-available folder. I used passenger.load.

    Paste the three lines in that file and save the file.

    Now in terminal use sudo a2enmod to enable the module. In my case, the file was, passenger.load. So, I used

    sudo a2enmod passenger
    Now, restart the server and use the command apache2ctl -M to find that passenger module is enabled.

    Stage 4:

    to apache2.conf:

    AddHandler application/x-ruby .rb .rbx

    Options Indexes FollowSymLinks ExecCGI

    LoadModule mime_module libexec/apache2/mod_mime.so

    systemctl restart apache2

  • How to install PHP on Windows Server now the Web Platform Installer is no more

    Previously installing versions of PHP on windows server was a breeze using the Web Platform Installer that microsoft very kindly supplied. For some reason known only to themselves they have now discontinued this and you have to install and configure it manually.

    Heres how to install it now:

    1) Using the Server Manager add from roles fastcgi. Webserver (IIS) > Web Server > Application Development > tick ‘CGI’
    2) Open your browser to Windows for PHP Download Page and download the latest PHP non-thread-safe zip package.
    3) Download the WinCache extension from the List of Windows Extensions for PHP.
    4) Extract all files in the PHP .zip package to a folder of your choice, for example C:\PHP.
    5) Extract the WinCache .zip package to the PHP extensions folder (\ext), for example C:\PHP\ext. The WinCache .zip package contains one file (Php_wincache.dll).
    6) Open Control Panel, click System and Security, click System, and then click Advanced system settings.
    7) In the System Properties window, select the Advanced tab, and then click Environment Variables.
    8) Under System variables, select Path, and then click Edit.
    9) Add the path to your PHP installation folder to the end of the Variable value, for example ;C:\PHP. Click OK.
    10) Open IIS Manager, select the hostname of your computer (not the website) in the Connections panel (this will enable PHP for all your sites), and then double-click Handler Mappings.
    11) In the Action panel, click Add Module Mapping.
    12) In Request path, type *.php.
    13) From the Module menu, select FastCgiModule.
    14) In the Executable box, type or browse for the full path to Php-cgi.exe, for example C:\PHP\Php-cgi.exe.
    15) In Name, type a name for the module mapping, for example “PHP”.
    16) Click OK.
    17) Select the hostname of your computer in the Connections panel, and double-click Default Document.
    18) In the Action panel, click Add. Type Index.php in the Name box, and then click OK.
    19) Click ok

    I recommend making a test.php file in your website root along the lines of:

    <?php

    phpinfo();

    ?>

    and testing that file in your browser to make sure php is installed correctly. Make sure to remove it later.

  • Hardening Windows VPN Server

    When you install a VPN on Windows Server you will quickly find every kind of attack heading your way. Most of this is levelled at PPTP which is a very old protocol and should be disabled in favour of L2TP. The simplest way to do this is turn off the firewall rule that is created for PPTP when you install routing and remote access. Look for the rule “Routing and Remote Access (PPTP-In)” Port 1723 and disable it.

    I also recommend the excellent IP Ban PRO (like fail2ban on linux), the other programs I tried for windows for blocking attack IP’s simply didnt work.

    I also recommend you rename the Administrator account to incoherent rubbish as its the username “Administrator” that 99% of the attacks target.

  • Apache Logs filled up by an attack?

    Heres a script we use to clear the apache logs on linux when apache is being attacked and the server disk quota is being constantly filled and locking the server:

    service apache2 stop

    cd /var/log/apache2

    rm *.gz

    Truncate -s 0 /var/log/apache2/access.log

    Truncate -s 0 /var/log/apache2/error.log

    Truncate -s 0 /var/log/apache2/error.log.1

    Truncate -s 0 /var/log/apache2/access.log.1

    service apache2 start

    Save the script in a file and make it executable (chmod +x filename) then place it in /etc/cron.hourly

    Remember to remove it after the attack subsides!

  • Server 2025 splash screen without login box

    When I road tested the new Server 2025 over RDP I came across an interesting problem which only occurred when I tried to connect from a windows desktop using mRemoteNg. If I left the server for an hour or so I got a splash screen without any login box. I wasnt really expecting one as it was an RDP session but I could do nothing to move forward with the login. After restarting the server several times to clear this problem I looked for a better solution.

    I will say that connecting from my iPad I did not get this problem so I looked for problems with mRemoteNg, but after trying a few different PC RDP programs I got the same result.

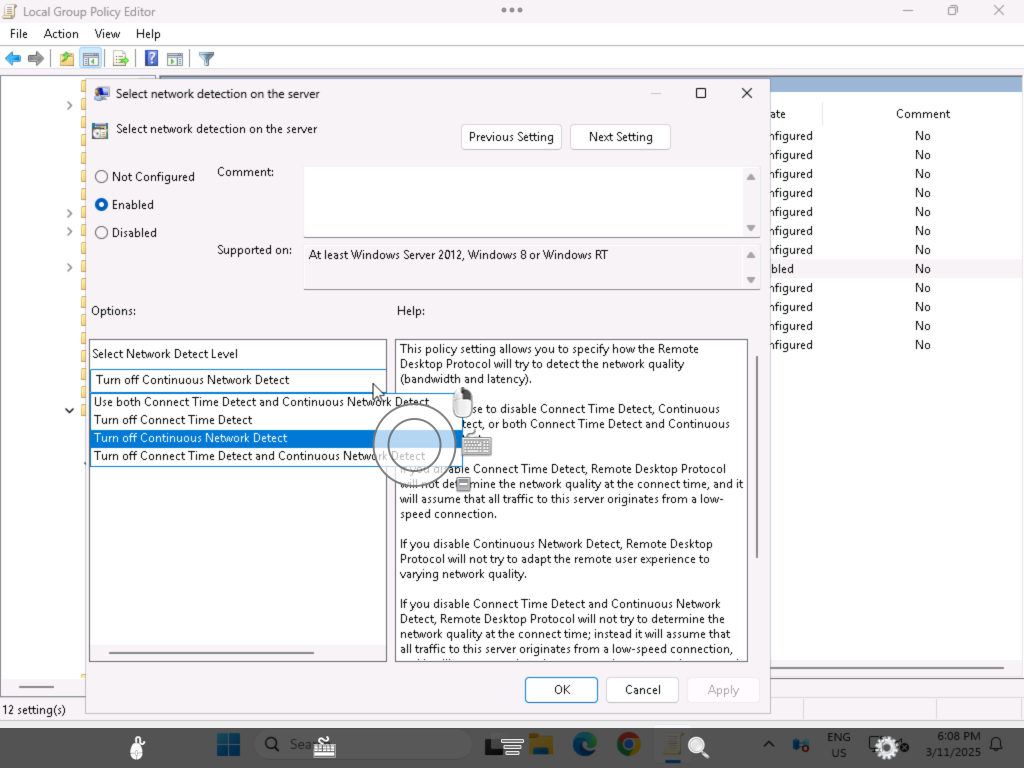
    The problem lies in a setting called “Continuous Network Detect” and is a problem because of a recent windows update.

    To solve this you need to use GPO Group policy edit.

    Computer Configuration -> Policies -> Administrative Templates -> Windows Components -> Remote Desktop Services -> Remote Desktop Session Host -> Connections

    Under ‘Select network detection on the server’ set ‘Select Network Detect Level’ to ‘Turn off Continuous Network Detect’

    Also turn off…..network detect, its a dropdown in the select network level setting.